 |
| Creating A Test Blog And Your First Post As An Experiment |
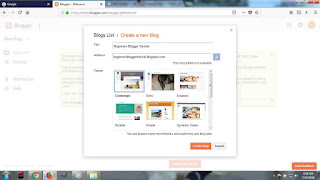
Hi bloggers, I have created a test blog to show you up the step by step guide, you also need to do so to get familiar with these things, so let's proceed.The title of this test blog is "Beginners Blogger Tutorial" and the blog address is "Beginners Blogger Tutorial" (remember the blog address availability may vary when you are creating your own blog).
Now simply hit the "create blog!" button which has been described with an image below.
 |
| Creating A Test Blog And Your First Post As An Experiment |
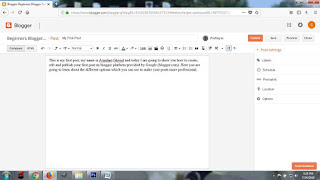
Now a screen will appear on the web browser with the option "Find a domain name for your blog and connect it instantly", simply choose the " No thanks" option for right now and proceed to your bloggers control panel. Dismiss the notifications for now and simply click the "New post" button.Now you will be redirected to a new window where you can create, edit or delete your post, let's do it. Now type the post title of your own(which is written as " My First Post" in this tutorial) and start writing on the topic as shown below.
 |
| Creating A Test Blog And Your First Post As An Experiment |
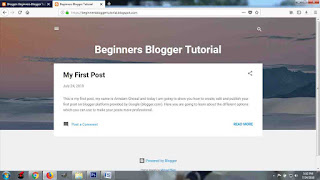
Now we can see that the post(My First Post) already been created but under my name "Arindam Ghosal" there is a red border indicating spelling mistake because Google always uses dictionary for spell checker options. Right clicking on the misspelled word will show you a couple of options for correction of the spelling, but here I will not do so because my name "Arindam Ghosal" is not included in the dictionary at all and it will be same for you also. Now simply hit the publish button and you are done, don't forget to cancel the Google + sharing button otherwise the test post will be shared on your G+ profile. We will do it later.Go to the blog address which is Beginners Blogger Tutorial (address will be different for your own blog) here in the tutorial and you will see your first post already published on the blog, also you can click the "view blog" option located at top left side of the blogger control panel to view the published blog and it will look like this.
 |
| Creating A Test Blog And Your First Post As An Experiment |
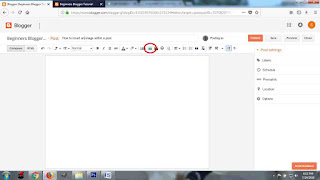
Now we need to know that how to insert an image inside the post as I am doing here in the tutorial mode to make you understand the things more clearly. No need to edit the first post right now.Simply go to the bloggers control panel and just click on the new post option to create another post, you will be redirected to the post editor page, place the mouse pointer on the red marked position as shown below in the image.
 |
| Creating A Test Blog And Your First Post As An Experiment |
You will see a little popup text "Insert image", click it and a new window will appear for you where you will see a couple of options for adding images such as "Upload", "From this blog", "From the Google album archive", "From your phone", "From your webcam" and "From a URL". As this is a tutorial for beginners we will select the "Upload" option and then "Choose files" option and will select a picture from our computer to publish it within the post. Here you will see "Add selected" option to add the image file within your post, click "Add selected" and you will see the image has been added in the post editor. Now clicking over the image will show you a couple of options for the image file such as image size and position, add caption, properties and remove. Resize or re-position the image as per your needs and leave the left options for now and hit the publish button to view your post.It will look like this.
 |
| Creating A Test Blog And Your First Post As An Experiment |
No comments:
Post a Comment